This article focuses on making each tire independent of the always leaky CTIS components. The basic theory is to isolate the tire, remove as many leak points as you can, and install a standard Schrader valve for manual control. I opted to leave all the upstream CTIS components in place. They serve no purpose now, but have no effect on performance and I simply don’t want to go to the effort of removing them at this time.
If you include shipping costs from Erik’s, I spent $25 per tire.
Tools needed:
Safety glasses, gloves, ear protection
3/4” impact with 1-1/2” and 1-1/8” sockets
wrenches
wire brush/wire wheel
prybars
BFH
liquid soap
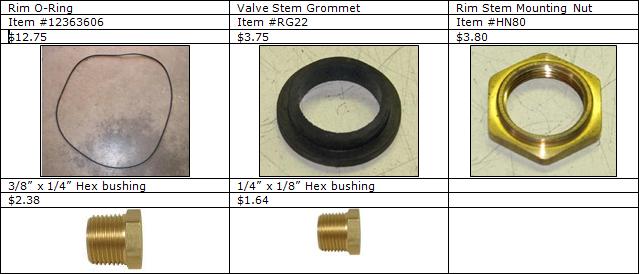
Parts needed:
I ordered the CTIS items below from www.eriksmilitarysurplus.com and you can pick up the bushings from any hardware store. You will need 1 set for each tire. The brass mounting nut is not required, but it’s a good idea in case you mess up the old one with your wrench. They’re cheap, too!
If you include shipping costs from Erik’s, I spent $25 per tire.
Tools needed:
Safety glasses, gloves, ear protection
3/4” impact with 1-1/2” and 1-1/8” sockets
wrenches
wire brush/wire wheel
prybars
BFH
liquid soap
Parts needed:
I ordered the CTIS items below from www.eriksmilitarysurplus.com and you can pick up the bushings from any hardware store. You will need 1 set for each tire. The brass mounting nut is not required, but it’s a good idea in case you mess up the old one with your wrench. They’re cheap, too!
Step 1: Remove tire
Remove 2 nuts and 2 hub bolts holding CTIS cover plate. Discard cover plate. Remove lug nuts with impact driver and 1-1/2” socket. Check to see if they are reverse thread. There will be an “L” stamped on each lug stud if so. Caution! These tires and wheels weigh 382lbs each. Enlist a friend to help.
Remove 2 nuts and 2 hub bolts holding CTIS cover plate. Discard cover plate. Remove lug nuts with impact driver and 1-1/2” socket. Check to see if they are reverse thread. There will be an “L” stamped on each lug stud if so. Caution! These tires and wheels weigh 382lbs each. Enlist a friend to help.
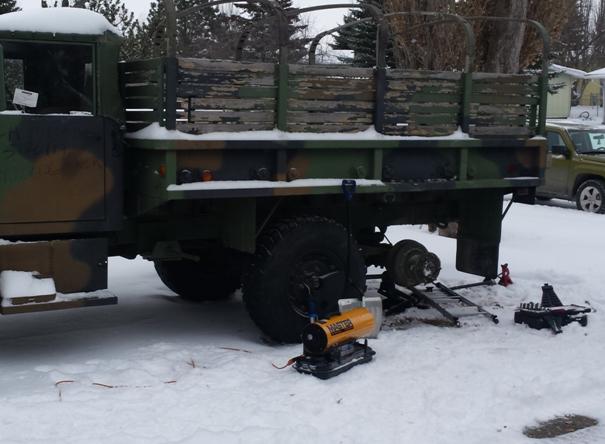
Figure 1: Properly chock and jack the truck to prepare for tire removal. Maybe stretch out too.
Step 2: Remove CTIS components
Caution! Deflate tire COMPLETELY. Then use 7/8”, 13/16”, and 11/16” wrenches to crack the air lines open. Start where the red arrows are pointing in Figure 2. Next, remove the 2 nuts (yellow arrows) holding the wheel valve in place. Discard the wheel valve and air lines. Then you can remove the elbow fittings from the wheel stud and pipe stem. Keep the Schrader valve (blue arrow) from the wheel valve and the elbow (green arrow) from the pipe stem for later. Also, remove and discard counterweight on opposite side of rim at this time.
Caution! Deflate tire COMPLETELY. Then use 7/8”, 13/16”, and 11/16” wrenches to crack the air lines open. Start where the red arrows are pointing in Figure 2. Next, remove the 2 nuts (yellow arrows) holding the wheel valve in place. Discard the wheel valve and air lines. Then you can remove the elbow fittings from the wheel stud and pipe stem. Keep the Schrader valve (blue arrow) from the wheel valve and the elbow (green arrow) from the pipe stem for later. Also, remove and discard counterweight on opposite side of rim at this time.
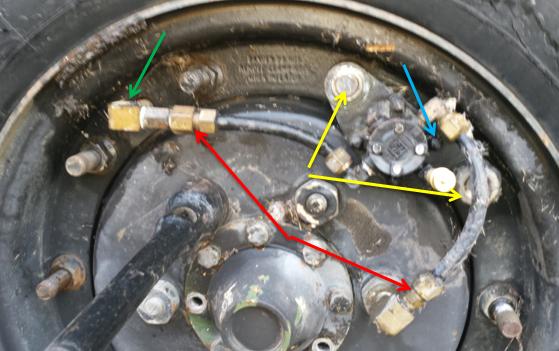
Figure 2: Remove CTIS components, but save two for later. Sorry for all the arrows!
 RSS Feed
